Pocha Owl Tutorial
I call him my little Pocha Pocha Owl because he's a a cute fat little version of traditional Japanese owl toys ('Pocha' is Japanese for chubby). When I went to Japan a few years ago they had these cute little fellows all over the place. I wanted to make my own when I got home but couldn't find a pattern I liked so I made up my own and added wings and a little heart which aren't traditional.
Like most of my patterns, this little fellow has been designed to utilize your favorite scraps and button stash. I have included variations for the wings, you can either make them from felt (easy) or make them from fabric (intermediate) instructions for both variations are of course included :)
STEP 1
Cut out your Tummy, Base and Body from your chosen patchwork fabric scraps. Cut out your Beak, Eye Colour, Eye White and Eye Black from felt scraps. Decide whether you wish to do felt wings or fabric wings, cut out 2 pairs from your chose material using the relevant template. Cut your Base Template out of plastic such as template plastic or a clean ice-cream container lid.
STEP 2
Pin and stitch one side of the tummy piece to body piece matching and finishing at the black dots marked ‘A’. Repeat for the other side of the tummy attaching it to the other side of the body.
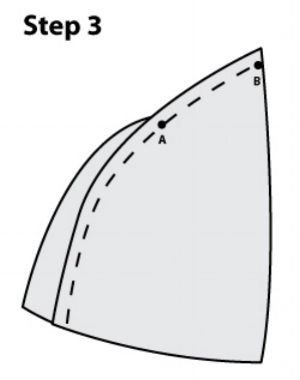
STEP 3
Fold the body in half and sew the seam between dot ‘A’ and dot ‘B’. Turn the body right side out.

STEP 4
Use a needle with strong thread to sew a gather stitch around the bottom opening of your owl’s body. Draw up the thread a little and stuff the owlbut avoid stuffing the top of the owl as this part will fold down to ‘shape’ your owl. Finishing drawing up the gather stitch and tie securely leaving an opening no greater than 1 & 1/2 inch wide.
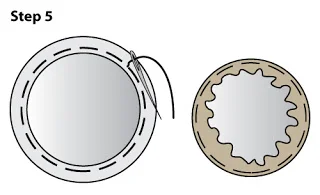
STEP 5
Sew a gather stitch around your base piece. Draw in your gather stitch just a little, then place your plastic base in the middle of your fabric base and draw your gathered in tight around it. Tie off your thread tightly.
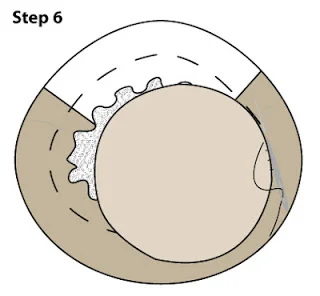
STEP 6
Position your base over the opening at the bottom of your owl. Stitch your base down to cover the opening until you get three quarters of the way around. Add extra stuffing if required and then finish stitching the seam closed.
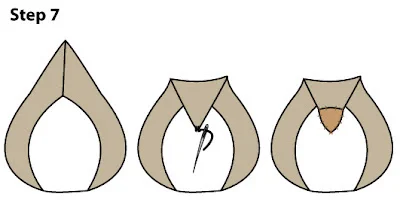
STEP 7
Fold the top of your owl down to shape the head. Tack the point in place with a couple of stitches. Now, take your felt beak piece and position this over the point. Stitch in place.
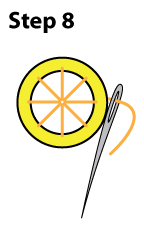
STEP 8
Take an Eye White piece and use the paper template to mark the centre point with a marker. Position the Eye White on the top of an Eye Colour piece and stitch in place with top-stitch thread. Repeat this step for the second Eye White and Eye Colour pieces.

STEP 9
Take one of your Eye Black pieces, place and stitch it in the centre of your Eye White and Colour piece. Repeat this step for the other eye pieces. NOTE: You could use black buttons instead of the black felt piece too, I just avoid using buttons on toys intended for children under 2 years or for pets.

STEP 10
Pin both completed eye pieces to your owl, positioning them one either side of the face next to the beak. When you are happy with the position of the eyes, stitch them to your owl’s face.

STEP 11
Your little owl is almost finished! The last thing we need to do is to make his wings. You can make the wings 2 different ways. The first way is to make the wings from fabric:
Fabric wings
Take two fabric Wing pieces and pin them right sides together. Using the template as a guide, sew around the wing leaving an opening. Trim your seams back by half and clip carefully into the curves so that they sit flat later. Turn your wing right side out through the opening. Press your wings with a hot iron to neaten the seams. At this point, add a little stuffing to the wing if you wish. Stitch the opening closed. Repeat this process for the second wing.

Felt wings
Take a felt wing piece and embroider your desired design. Take another felt wing piece (the one you want as the underside) and pin it to the back of your embroidered wing, wrong sides together. Neatly stitch around your wing with a decorative stitch of your choice and note that the back stitching will be visible on the underside of the wing. Repeat this process for the second wing.

STEP 12
Now to attach the wings to your owl. Use a pin to position your wings either side of your owl’s body. You can then either:
- stitch the wing straight to the body using strong thread creating a ‘cross’,
- whip-stitch the top edge of the wing to the body which creates the best ‘flapping motion’,
- or you can use buttons to attach your wings.
CONGRATULATIONS! Once you have attached your wings, your little Pocha Pocha Owl is finished :)

Please feel free to make as many owls as you wish for friends and family. I’m also happy for you to use this pattern to teach sewing students or to sell to make money for charity and school fundraisers.
- Pinky xox