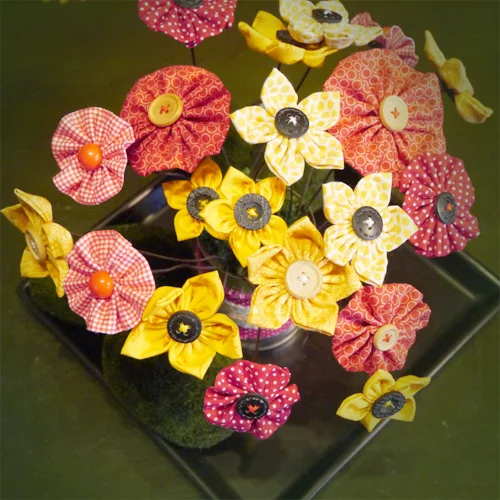
2 Types of Fabric Flowers
Here is another great way to use up little fabric scraps. This tutorial will show you how to make 2 different types of flowers and you only need to use basic hand sewing skills to make them.
FLOWER 1: Kanzashi Flowers
There are several different versions of Kanzashi flowers out there. This version is very easy and you can use all sorts of fabric and make them in different sizes if you’re feeling adventurous.
Materials & Tools
- Yummy scraps of patchwork fabric
- Strong thread (such as topstitch or upholstery thread)
- Buttons for the center of your flowers
- Needle
- Scissors
You’ll need a circle template to cut out your petals. This can be any size but mine at the convention were made with 2” and 2 1/4” circles. If you needed another excuse to buy your quilter’s circle templates this is a good one! Hahaha!
Here is a template for a few different size circles anyway so you don’t have to draw them if you don’t have templates.
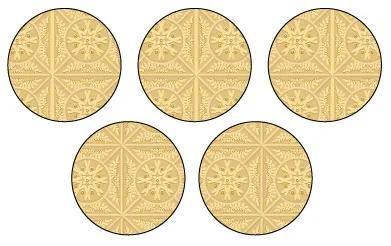
Step 1.
Using your chosen circle size, cut out 5 circles from your fabric.
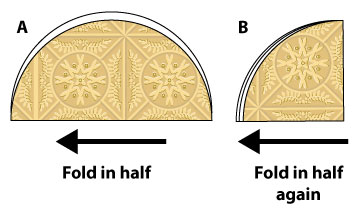
Step 2.
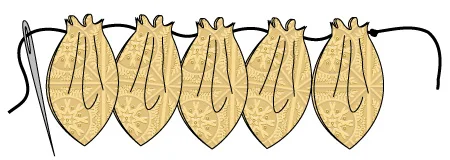
Prepare your needle and thread, leaving a 2” tail after your knot for fastening your gathering later. Take one of your circles, fold it in half and half again.

Step 3.
Run a gathering stitch along the raw edge of your quartered circle making sure that you catch all four layers. If you start the first stitch going through from the back to the front of your petal, make sure the last stitch on the petal goes from the front to the back, this will make your petals more uniform.
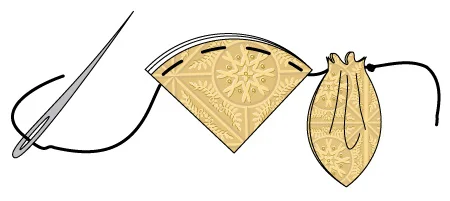
Step 4.
Repeat step 3 for the remaining four petals, gathering them as you go.
STEP 5
Leaving your needle attached, tie the thread ends together tightly to draw your petals in creating the flower.
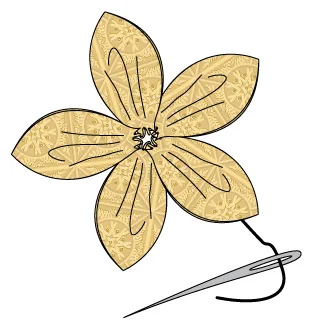
STEP 6
Choose which side you'd like to be the back of the flower. Draw in the hole in the middle by doing a few stitched across it catching the petals.

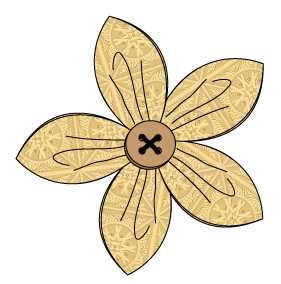
STEP 7
On the front of your flower, sew your button in the middle covering the hole. Tie off. Congratulations! You've made your first flower :)
EXTRA BROWNIE POINTS: Go absolutely mental and make a whole bunch while you're watching Gardening Australia (or Doctor Who if you're like my mum). Then continue reading these tutorials for the next type of flower and how to attach your little beauties to stems.
FLOWER 2: The Rosette Flower
This fabric flower is reminiscent of good ol' yo-yos but with one important difference; you use a strip of fabric instead of cutting out a round. So you can use fabric with stripes that will make a pleasing radial effect. This project is perfect for using up left over bits from jelly rolls if you're a quilter.
Here is the template for you to use but once you've made a few in this size, go and experiment.
- The shorter the length, the more the flower will 'pull up' into an opening bud look,
- The longer the length, the more gathers there will be and the flower will become inverted like an Echinacea flower.
Materials & Tools
1. Yummy scraps of patchwork fabric
2. Strong thread (such as top-stitch or upholstery thread)
3. Buttons for the center of your flowers
4. Needle
5. Scissors
You can use your ruler and rotary cutter to cut a 2 by 8 inch strip or right click on he image below to save it to your computer and then print it out.

STEP 1
Cut out your 2 x 8 inch strip of fabric from your delectable scraps.

STEP 2
Fold your fabric strip in half, right sides together, so that the short ends match up. Stitch the edges together using a 1/3 inch seam. Leave your needle and thread attached.

STEP 3
Finger press your seam open.

STEP 4
Now the slightly tricky bit if you're a fumble-fingers like me; Fold the bottom raw edge up to meet the top raw edge. You should now have the right side of the fabric showing inside and outside your fabric circle. Run a gather stitch all the way around just in from the raw edge making sure you catch both layers. Making your gather stitches as equal as possible will insure a neater looking flower, if you can't don't worry - imperfection adds character (speaking from experience HAHAHA!).

STEP 5
Draw your gather stitched in to form the flower. Tie your threads together tightly to secure but leave your needle attached.

STEP 6
Choose which side you'd like to be the back of the flower. Draw in the hole in the middle by doing a few stitched across it catching the petals.

STEP 7
On the front of your flower, sew your button in the middle covering the hole. Tie off and you're done.
Crank up the production line because the next part is all about attaching stems!
HOW TO ATTACH STEMS TO FABRIC FLOWERS
...and any other crafty flowers for that matter!
I invented this method for attaching stems when I decided to make all the flowers for my wedding. It works for fabric, paper, and yarn flowers alike. So if you're an 'All-Rounder' crafter like me (literally and figuratively in my case) try some other flower tutorials on the net and use this tutorial for attaching them to stems.
Materials & Tools
- Cardstock that matches your stem colour (available from Scrapbooking and Craft shops)
- 18 gauge wire pre-wrapped with cotton or paper in green or brown (I got mine from Spotlight and you can also get it from Florist Suppliers)
- Fabric Glue
- Flower Punch (Available at Craft and Scrapbooking stores)
- Small hole punch or Awl or mattress needle
- Needle-nose pliers
- Fray Stopper or clear Nail Polish

STEP 1
Punch out 2 flowers from your cardstock, alternatively you could just cut 2 circles the same size with scissors to save buying special tools. Use a small hole punch, awl or needle to make a small hole in the center of one of your cardstock flowers.

STEP 2
Take your wire and bend the top inch to a right angle. Then take your pliers and curl the end round in a small loop. This stops the wire sliding out of the hole and beheading your flower later on.

STEP 3
Use your fabric glue to adhere the cardstock flower WITHOUT the hole to the back of your fabric flower. Let dry.

STEP 4
Slide the cardstock flower WITH the hole onto your wire and push it to the top.

STEP 5
Add glue to the top of your cardstock flower and wire and....

STEP 6
...stick it to the back of your fabric flower on top of the other cardstock flower. Press it together with your fingers until it holds well. Stand the flower face down until the glue dries completely.
The last thing you might want to do is apply a little bit of Fray Stopper or Nail Polish to the end of your wire to stop the cotton or paper unraveling.
There you go! You now have the know-how to make a whole garden full of fresh, fabulous fabric flowers.... and if you use up all your scraps you'll just have to go pick up some yummy fat 1/8s to make some more. SHUCKS!
- Pinky xo