Bippy the Bunyip Tutorial

So what is a Bunyip? These mysterious mythical creatures come from Australia and can be found in swamps and Billabongs. Traditionally, Bunyips were thought to drag people away but we have enough scary creatures in Australia already. Bibby is a kind young bunyip who often helps lost travelers back on to their path. He's definitely a fantastic companion choice for your little adventurer!

You are probably here searching for these detailed instructions because you have bought or are thinking about buying my easy cut-and-sew bunyip pattern so thank you you very much for choosing my design, I am very chuffed :)
If you have stumbled across this blog post and don't know what I'm going on about, you can check out the Bippy Bunyip cut-and-sew fabric for purchase from the Crafty Possums Online Shop or direct from the company that prints the fabric for me here: http://www.spoonflower.com/designs/3965934
FABRIC CHOICE
I made my bunyip you see in the images from Spoonflower's faux suede. Now, It looks fantastic BUT because it's thicker and has a bit of 'pile' it can be a bit tricky to sew. Depending on your sewing skills you might like to consult this list if you haven't purchased it yet:
- Linen Cotton Canvas (27" by 18") Fat quarter - Ideal for beginners as the fabric doesn't slip and slide or stretch.
- Minky (27" by 18") Fat quarter - Gorgeous minky gives the best form but can be tricky to sew as it has a pile and stretches so best if you're an intermediate sewer.
- Faux Suded (27" by 18") Fat quarter - thick and a bit hard to work with so I recommend this one for if you have advanced sewing skills.
Of course, That's not to say you can't give something harder a go if you really want to. Just go slow and steady :)
Buying the panel direct from Spoonflower? Yes, you must stick to a fabric that has a 27" by 18" size. If you get one of the other fabrics you'll be missing body parts!

Got your Fabric? Lets get Started!

STEP 1
Carefully cut out your fabric pieces along the edge where they meet the white background.
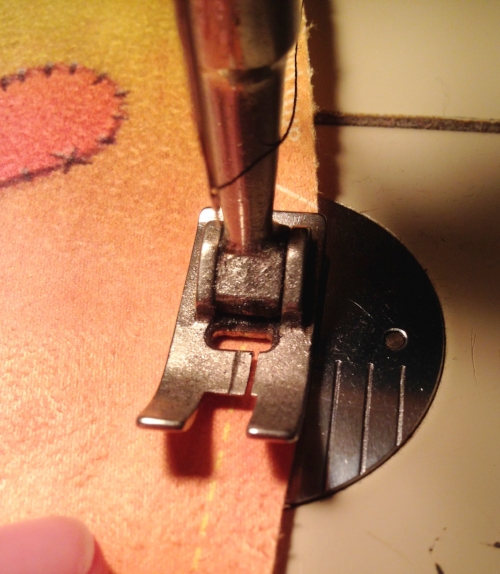
NOTE: Whenever you get ready to sew up a project, check your seam allowance against your sewing machine. In this photo you can see I have lined up my dashed seam line under my needle and I can see that the edge of my fabric lines up with the edge of my foot. So when I'm sewing my seams and can't see the seam line, I know I just need to line the edge of my fabric up with the edge of my sewing foot.
TIP: If your fabric edge doesn't line up with anything like your foot or base plate, place a piece of masking tape across your sewing machine plate as a temporary guide.


STEP 2
With right sides of the fabric together, sew all of the darts on the BODY FRONT and BODY BACK pieces.


STEP 3
With Right Sides of the fabric together, sew around the ARMS matching and ARM FRONT and ARM BACK together and leaving open the top of the arms for turning and the side of the arms for stuffing as indicated.


Clip seams and turn right sides out.

STEP 4
Right sides together, sew around legs matching a LEG FRONT to a LEG BACK and leaving the top open for turning and stuffing.


Clip Seams and turn right side out then stuff leaving half an inch un-stuffed at the top.

TIP: If you're doing a lot of toy-making or stuffing other fiddly things, get yourself a pair of medical hemostats! They are awesome for grabbing stuffing and shoving it in pokey bits such as skinny arms etc. They allow for precision stuffing and therefore you end up with a more professional project. They're also great for turning things the right-side-out. This isn't an endorsement I get paid for, seriously I just love them! Search Google or Ebay to find them maybe.


STEP 5
Right sides together, sew around ears matching an EAR OUTSIDE to an EAR INSIDE and leave the straight edge open. Clip seams and turn right side out.


Press and then fold and tack-stitch down fold as indicated.


STEP 6
Right sides together, sew around tail leaving straight edge open. Clip seams and turn right side out.


Stuff leaving last half inch empty, turn seam in and finger press.


STEP 7
With right sides together, sew around horns leaving straight edge open. Clip seams and turn right side out.

Stuff both horns very lightly leaving half an inch un-stuffed. This makes it easier to put your bunyip together at the end.

STEP 8
Pin arms, legs, and ears to BODY FRONT facing inwards (front pieces will be against BODY FRONT) using the indicated placement guides written in the seam allowance. Tack-stitch body parts in place, remove pins.

Repeat this step to attach horns to the back body piece.


STEP 9
Pin BODY BACK over BODY FRONT right sides together sandwiching body parts within. Carefully sew around leaving and opening as indicated for turning.

Clip Seams and turn right side out.


STEP 10
Stuff Body and arms. Slip stitch openings closed.


Attach tail to BODY BACK across placement line.

STEP 11
CUDDLE YOUR NEW BUNYIP!

I hope you have enjoyed sewing your bunyip and I'm sure you'll love him as much as my little guy does. Thanks for stopping by.
- Pinky xoxo